
Example question: “I have been using an old laptop for work, and I am considering selling the device. Beforehand, I need to ensure all of my files have been deleted and that they can’t be recovered by other people in the future. How can I achieve this?”
Hardly a day goes by when we don’t hear of a data breach, cybersecurity incident, or an accidental leak of confidential and sensitive data belonging to organizations and individuals alike.
Data protection has to be at the forefront of our minds. Sometimes, you may need to delete files or wipe drives, but there is often a chance that deleted content can be recovered with the right tools. However, the opposite is also true, and with the right software, you can permanently delete your files in a secure manner.
The experts at SecureData explain how to permanently delete your sensitive information, files, and disks to prevent any future recovery efforts from succeeding.
Why You May Need to Permanently and Securely Delete Files
You may need to permanently delete files, going beyond the standard “Send to the recycling bin” PC function, for many reasons:
- Protecting privacy: You may want to securely delete files and drives to maintain your own privacy, ensuring that your files and sensitive information are securely wiped. By extension, privacy impacts not only individuals but businesses, too, that may need to permanently wipe data to protect financial information, consumer records, intellectual property, and proprietary data.
- Containing sensitive data: Files can be securely deleted to ensure that they do not fall into the wrong hands. Unfortunately, accidental transfers, insiders, or malicious actors can lead to data breaches and cybersecurity incidents.
- Compliance: Data protection is now a hot topic for businesses and governments alike, and so organizations are tasked with reaching the standards of modern data protection laws, including the EU’s GDPR.
Common Methods to Securely Delete Files
It is possible to enhance the security of file deletion attempts by using several methods:
- System deletion features: Some operating systems and drive management utilities will provide built-in secure deletion functions.
- Encryption: To reduce the possibility of data recovery following secure deletion, you may wish to use an encryption facility beforehand. This will reduce the likelihood that data can be read, even if it has been recovered, without the necessary encryption key.
- Physical destruction: You can physically destroy drives and storage media to try and prevent data recovery. However, this can be wasteful and may not be successful unless the hardware is irrevocably damaged beyond repair.
- File shredder utilities: Third-party utilities that specialize in file deletion can use methods including overwriting and wiping target files to prevent data recovery. Dedicated file shredders are often the most efficient way to securely delete information. We recommend using SecureShredder Data Sanitation to complete these tasks.
SecureShredder Data Sanitation
SecureShredder Data Sanitation is a utility dedicated to safely and securely wiping files, folders, and disks.
Available as a free download, the Windows-based software can even erase disks of over 4TB in size. USB and flash storage cards, too, can be securely wiped clean.
SecureShredder will quickly overwrite target files with pseudorandom data, ensuring that information cannot be recovered. While this method is suitable for the majority of users, you can also use the software to conduct advanced and top-level deletion, including three passes, which is a U.S. Department of Defense standard suitable for businesses and compliance.
Below, we have provided a step-by-step guide for safely deleting your sensitive and confidential files with the SecureShredder Data Sanitation utility.
How To Securely and Permanently Delete Files using SecureShredder Data Sanitation
Step 1. Download SecureShredder Data Sanitation (SecureShredder) and launch the utility on your Microsoft Windows machine. Ensure your PC is running Windows 7 or later.
Depending on your operating system, you may need to grant permission for the launcher to make changes to your computer. Allow this to ensure the utility can install itself on your machine.
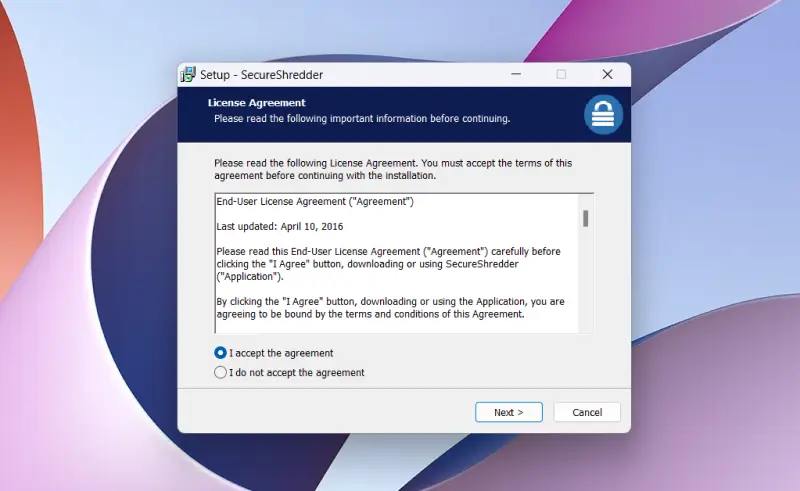
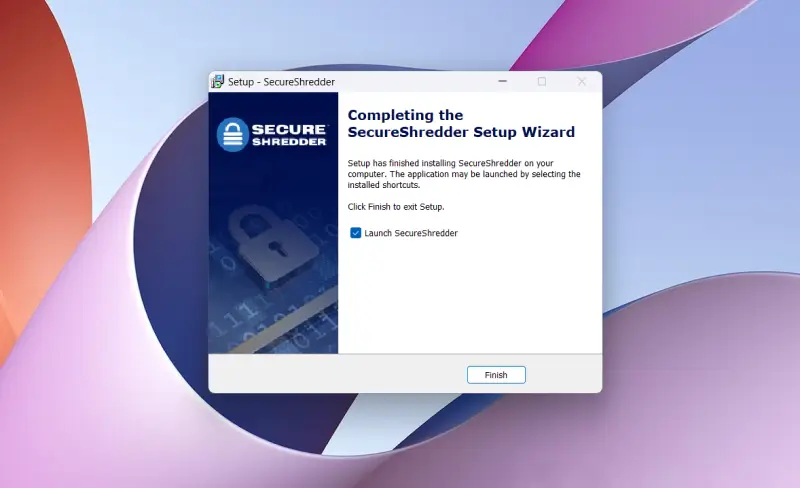
Step 2. Read and accept the Software License Agreement, click install, and the software can then be launched. Select the box next to “Launch SecureShredder” and click the “Finish” button.
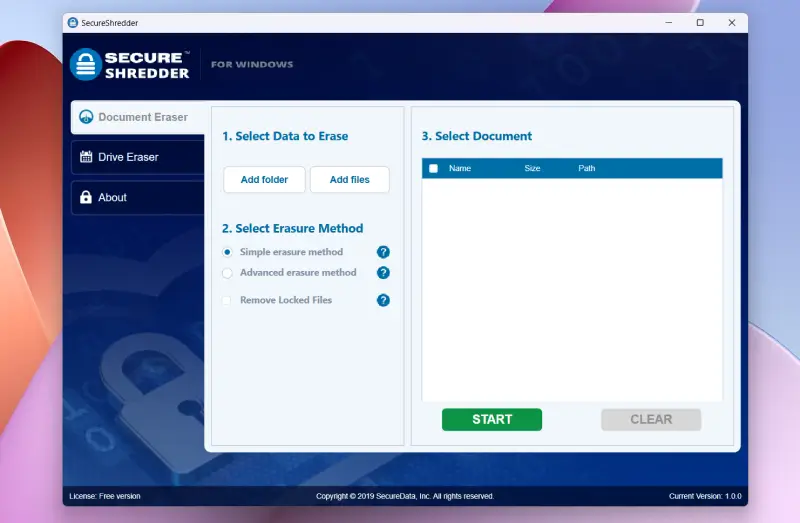
Step 3. Select an Option for Erasure: On the landing screen, you are given two options: Document Eraser or Drive Eraser.
Step 5. Choose to add a folder or individual files for deletion. A file picker will appear, allowing you to navigate to your target files. Click open to add your file, or files, to the list. We recommend that you choose to add folders if you have numerous files set for deletion.
Step 6. Select one of the two options for file deletion. SecureShredder provides two types of secure file deletion: Simple Erasure and Advanced Erasure.
- Simple Erasure is suitable for the majority of deletion use cases as it uses algorithms to overwrite files with pseudorandom data, a feat that makes data recovery theoretical.
- Choose Advanced Erasure if you require a more advanced file shred, such as to adhere to business compliance standards. This selection meets the three-pass requirements of the U.S. DOD Wipe Standard.
- You can also choose to remove locked files from your list before proceeding.
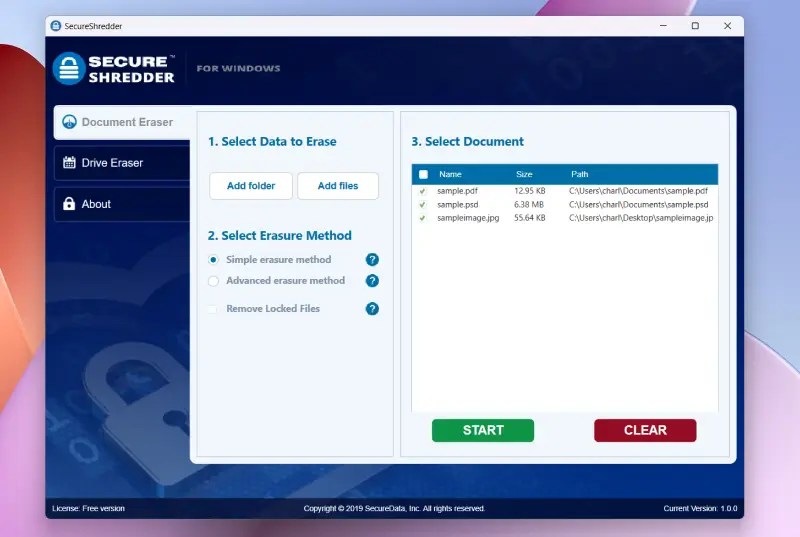
Step 7. Press the green “Start” button to begin the data deletion process. However, if you need to make changes to your file deletion list, click the red “Clear” button.
A warning notice will appear asking if you are sure want to delete selected items. If you are unsure or you want to make changes, click the red “No” button. Otherwise, click the green “Yes” button to begin the secure file deletion process. Keep in mind that once you have clicked the “Yes” button, your files will be permanently deleted and cannot be recovered.
Congratulations, your files have now been securely deleted. Removing files will only take a few seconds. However, if you are deleting a large number of files or folders, you may see a process log screen. Otherwise, you are now free to check your target files have vanished from your system.
If you wish to erase a full drive, navigate back to the home screen and click the Drive Eraser tab.
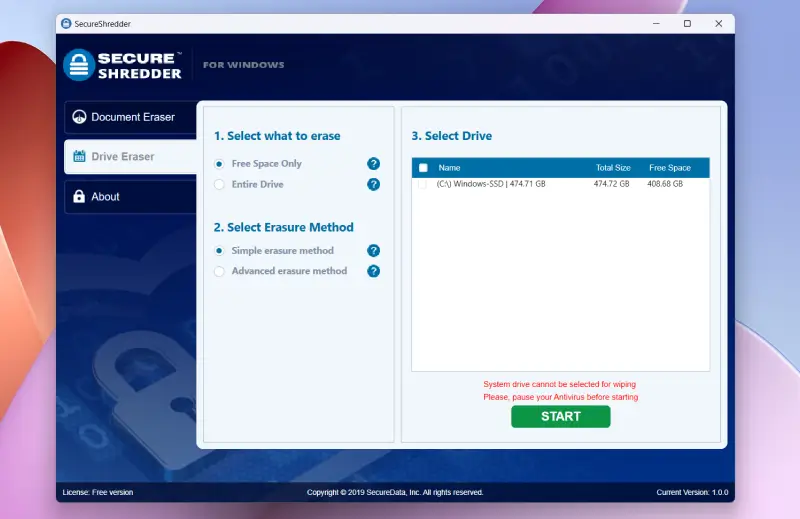
- Select the drive you want to erase. The utility will display its name, type, total size, and how much space is free and available.
- Choose whether to wipe available space only or the entire drive.
- Pick between a simple erasure method or an advanced erasure method. While the simple erasure method will suffice for most, the advanced option is preferable for organization-level file deletion.
Frequently Asked Questions
What is data shredding?
Data shredding, also known as data wiping, is the process of irrevocably and permanently erasing information. Data shredding can be used to delete information from PC systems, drives, and flash storage. The goal of data shredding is to prevent future data recovery through conventional methods.
How secure is data shredding?
Data shredding is typically achieved by writing over files and drives, repeatedly, thereby changing the original content to meaningless data, alongside deleting partitions and logical drives. Erasing and wiping target systems and files in this manner ensures that information is securely deleted.
Is backing up my data important?
Backing up your data is always good practice, especially when sensitive or confidential content is involved.
Data loss can occur unexpectedly due to power failures, system crashes, human error, disk fragmentation, problems during the read/write process, and more. We cannot anticipate when data could become corrupted or erased, and so maintaining a frequent backup schedule is key.
You can back up your data in many ways: manually and through the use of backup drives, USB flash storage, and online storage systems, and you could also consider using vendor services that provide cloud backup.
However, if you experience data loss and no backup is available, a dedicated data recovery solution can help you recover your files.


")


