
A .pst file is an Outlook data file. It’s saved on your computer, and contains data from your Microsoft Outlook account, like your email messages and other information. Typically, .pst files are used by POP accounts, a type of email account created when you add an email to Outlook from an internet service provider (ISP) like AT&T.
Like any type of data file, it’s possible for a .pst file to get corrupted. This might happen with a large .pst file that exceeds the size limit due to third-party add-ins or apps. It can also occur if you close Outlook abruptly, or if your file is copied and stored in a way that causes an error, such as on a network drive or cloud file location.
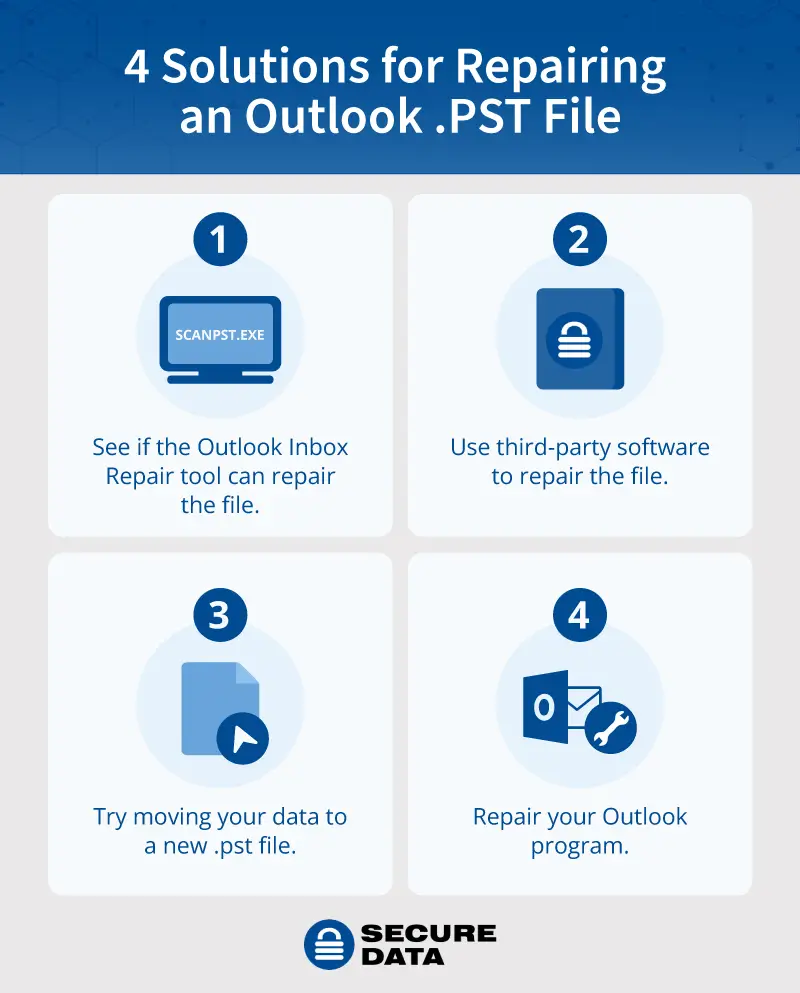
You can usually repair a damaged .pst file using file repair software, but you might even be able to fix it using MS Outlook’s built-in capabilities.
This post explains how to repair Outlook .pst files using Microsoft’s Inbox Repair tool (SCANPST.EXE), as well as other solutions you can try.
How to use the inbox repair tool (SCANPST.EXE) to repair a .pst file
If you’re dealing with a corrupt .pst file, the very first step you should take is using the Inbox Repair tool (SCANPST.EXE).
If you have an Office 365 account, Exchange account, IMAP account, or Outlook.com account, your Outlook account data will be stored in a different file format, an .ost file. The Inbox Repair Tool should work for damaged .ost files too, but if it doesn’t solve your issue, you’ll have to try other troubleshooting steps, like renaming the .ost file or using an Outlook mailbox repair software.
Here’s how to use the Inbox Repair tool to repair Outlook data.
1. Back up your .pst file
Before you try any kind of data recovery strategy, make sure you back up your file in case something goes wrong. Then, follow these steps:
- Click File in the top left corner.
- Choose Open & Export and then Import/Export.
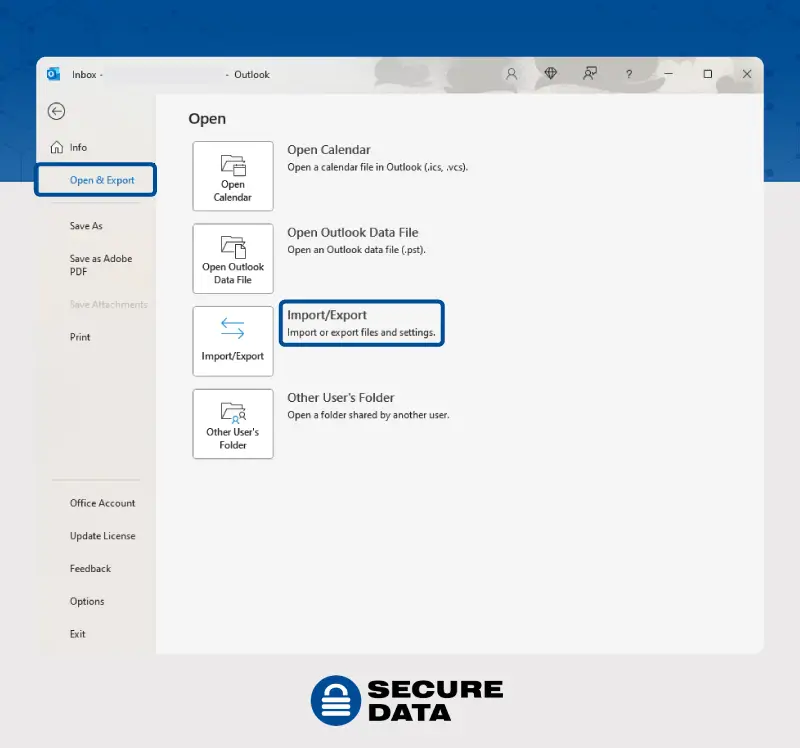
- Choose Export to a file and then Next.
- Click Outlook Data File (.pst) and then Next.
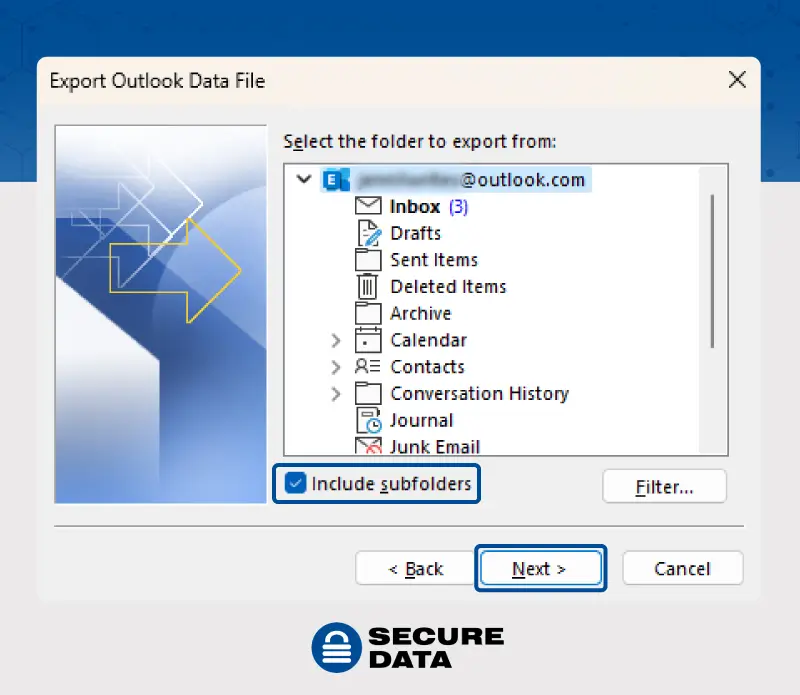
- Select the name of the email account to export. Make sure that the Include subfolders check box is selected, and then click Next.
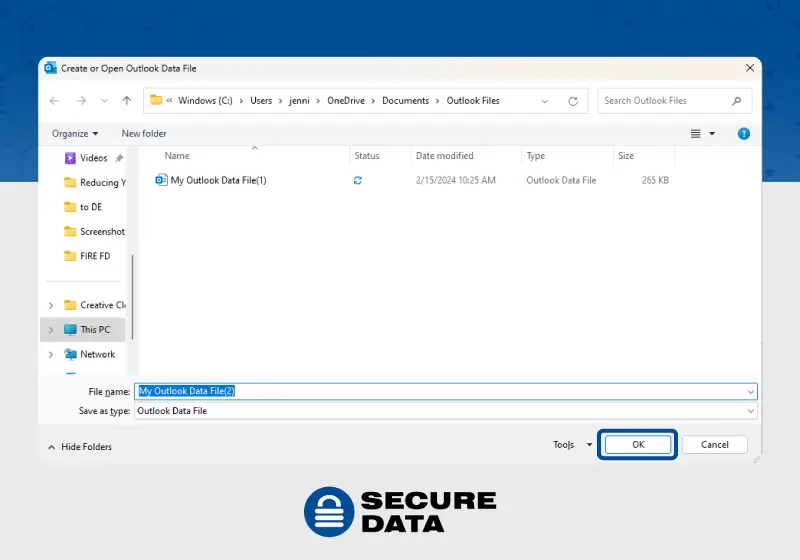
- Click Browse to choose where to save the Outlook Data File (.pst). Enter a filename, and choose OK to continue.
- Click Finish.
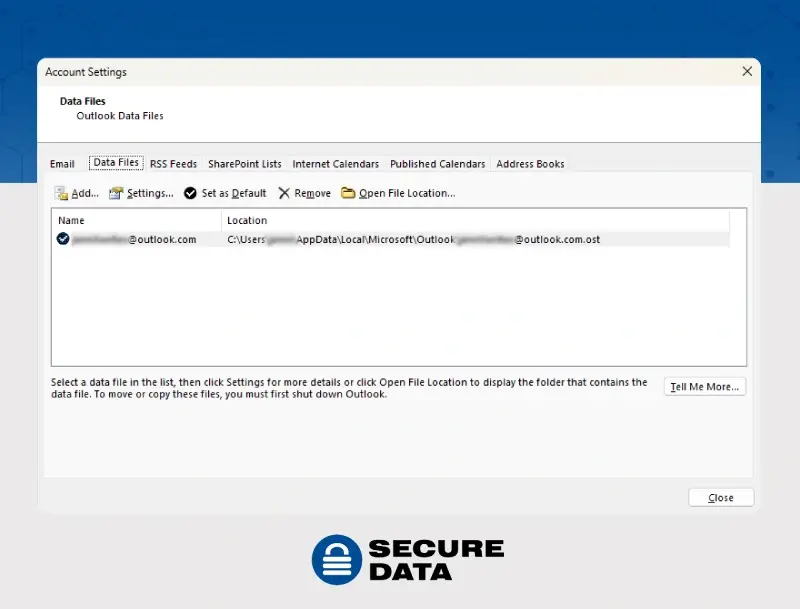
2. Check the location of your .pst file
Before you open the recovery tool, check where your file is saved — you’ll need to be able to find your file location to select it for repair. Here’s how to locate your .pst file:
- Go to File > Account Settings > Account Settings.
- Select the Data Files tab.
- All Outlook Data Files (.pst) will be listed along with the name of the account the files are associated with.
- The default data file will have a checkmark next to it and will be labeled "Outlook Data File" or "Personal Folders File."
3. Repair the .pst file using SCANPST.EXE
Now you’re ready to start the repair process. You can repair .pst files with these steps:
1. Navigate to one of the these file locations after exiting Outlook:
- Outlook 2019: C:\Program Files (x86)\Microsoft Office\root\Office16
- Outlook 2016: C:\Program Files (x86)\Microsoft Office\root\Office16
- Outlook 2013: C:\Program Files (x86)\Microsoft Office\Office15
- Outlook 2010: C:\Program Files (x86)\Microsoft Office\Office14
- Outlook 2007: C:\Program Files (x86)\Microsoft Office\Office12
2. Open SCANPST.EXE.
3. Use the Browse button to choose the Outlook Data File (.pst) you need to scan — find the file based on the locations in step 2 above.
4. Begin the scan by clicking Start.
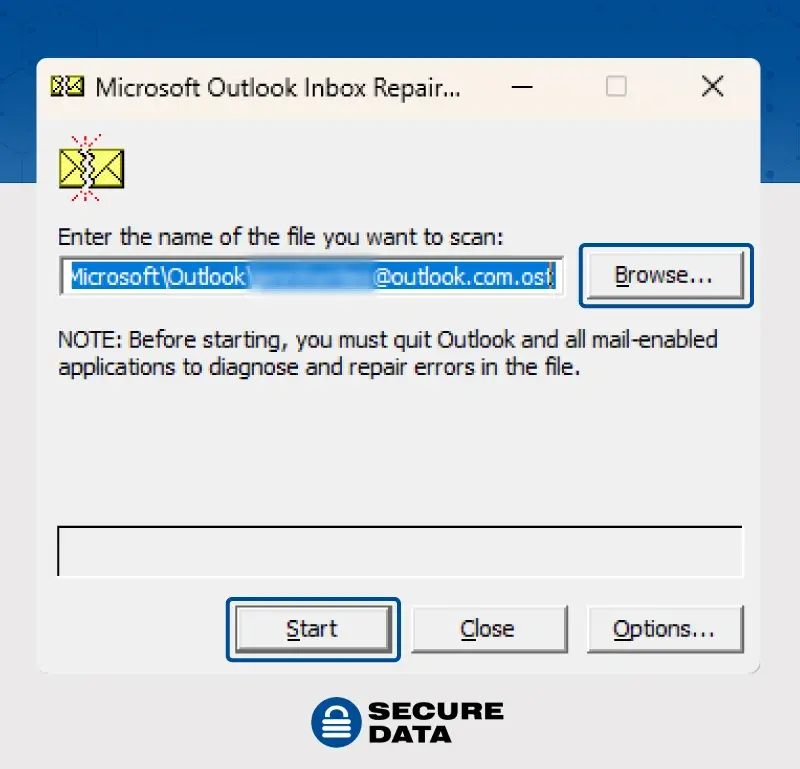
5. If the scan finds errors, use the Repair button to correct the errors.
You may need to run the recovery tool several times to completely repair your .pst file. When the repair is finished, open Outlook with the profile associated with the Outlook data file you just repaired.
After running SCANPST.EXE, you might find a folder called Recovered Personal Folders in your files that contains your default Outlook folders or a Lost and Found folder. The folders might just be empty and redundant, or they might contain recovered data that Outlook couldn’t place in its original locations.
What to do when you can’t repair the .pst file with SCANPST.EXE
The Inbox Repair tool is built to diagnose and repair many potential errors with Outlook data files, but it isn’t always the best solution. For example, it can’t help if your file was permanently deleted or corrupted beyond its repair abilities.
In a situation like that, you might need to try another solution, like a more powerful third-party tool. Here are some other troubleshooting strategies you can use.
1. Use a third-party tool or data recovery service
The Inbox Repair Tool can’t always recover a heavily corrupted .pst file. If you’re tried using it with no luck, the best fix might be a third-party tool.
Third-party recovery software, like our Outlook file repair software, have features designed to recover specific emails, attachments, contacts, and other items from corrupted or damaged .pst files. Just make sure the tool you choose is from a reputable software provider so you don’t risk worsening the situation or losing your data forever.
2. Move your data to a new .pst file
If you can’t repair the original .pst file, moving your data to a new file might help. To create a new file:
- From the Inbox, select New Email > More Items > Outlook Data File.
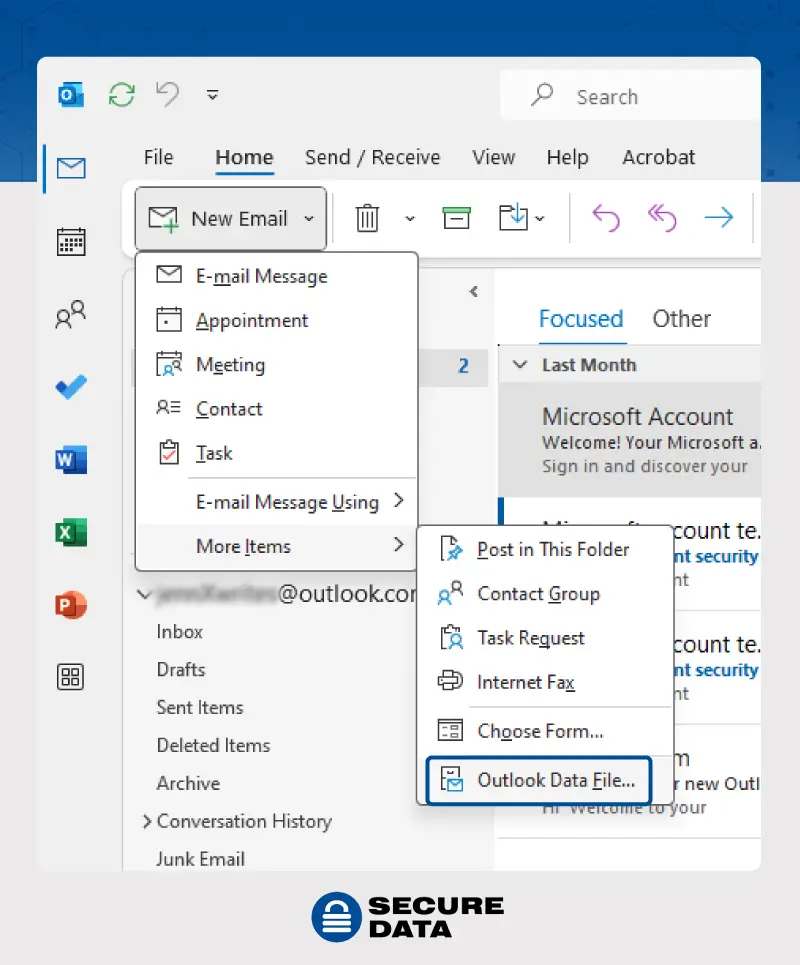
- Enter a Filename.
- To add a password, check the Add Optional Password box.
- Select OK. Type a password in both the Password and Verify Password text boxes and select OK again.
Then, you should be able to drag and drop items from the existing .pst file to the new file. Or, if you already tried running the Inbox Repair tool unsuccessfully, you can drag the items in the Lost and Found folder into the new data file, and then delete the old .pst file.
If you’re not sure what to move and don’t want to risk missing items by dragging and dropping, you can also use the Import and Export Wizard to migrate important data from your existing .pst file.
- Select File from the Outlook ribbon.
- Select Open & Export > Import/Export to start the Import and Export wizard.
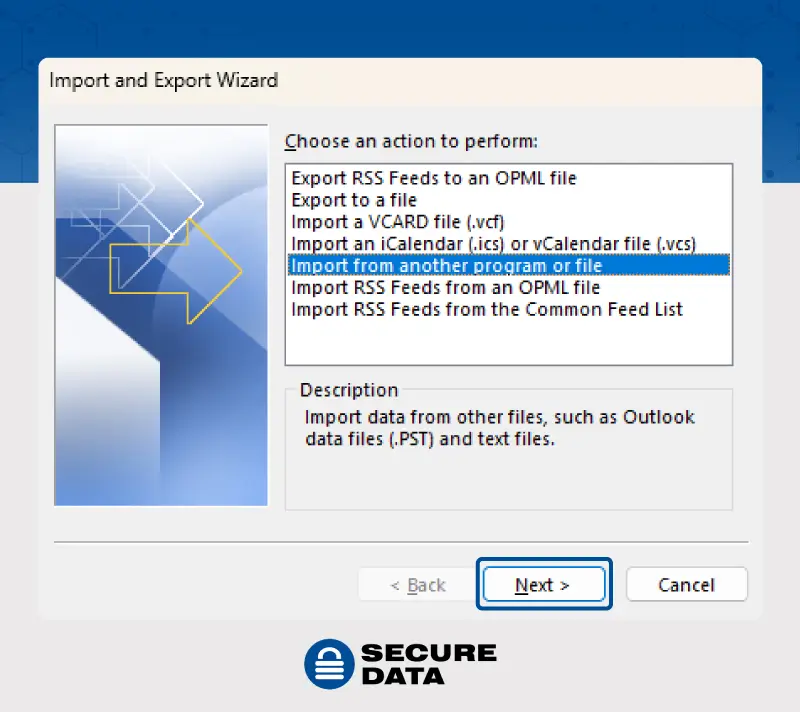
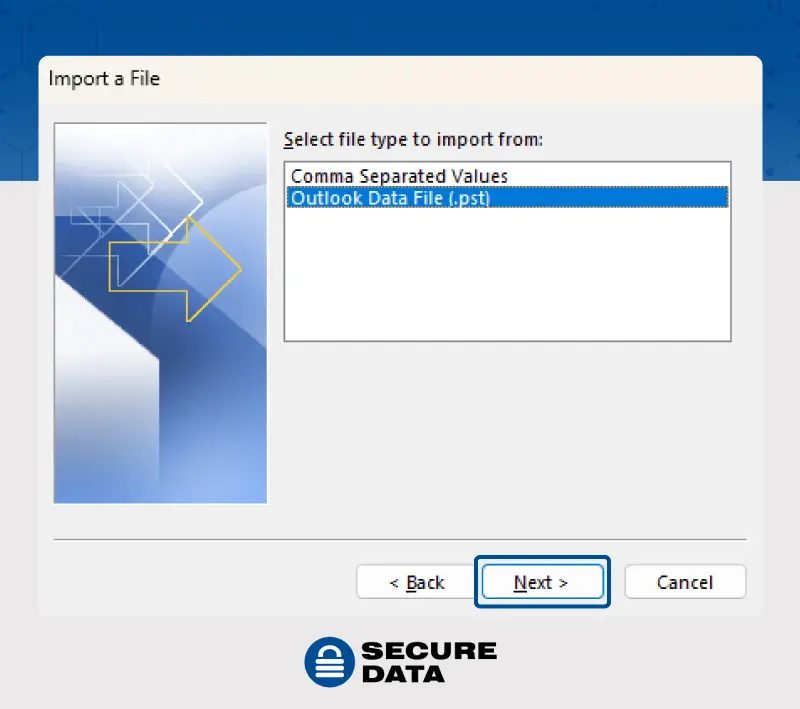
- Under Choose an action to perform, find and select the phrase “Import from another program or file,” and then click the Next button.
- Select the file to import from by choosing Outlook Data File (.pst) and then click Next.
- Navigate to the .pst file you want to import. Select how you want the emails and contacts dealt with under Options, then click Next.
- If the Outlook Data File (.pst) has a password assigned to it, you should enter the password and then click the OK button.
- You can choose your Microsoft 365 mailbox in this window if you want to import the contents of your .pst file there.
- When you click Finish, Outlook will immediately start importing the contents of your .pst file. When the progress box disappears, the import is finished.
If you already used the Inbox Repair Tool, you may be able to import items from a backup (.bak) file that the repair tool created. For example, if the tool wasn’t able to recover some individual items, you might still be able to recover them by importing them to the new .pst file. Here’s how to do it:
- Locate the .bak file (for example, youremail@outlook.com.bak) that the Inbox Repair tool created by navigating to the folder in which the .pst file has been stored.
- Make a copy of the .bak file and rename it with a bak.pst extension. For example, youremail@outlook.com.bak.pst.
- Take the bak.pst file and import it into Outlook, and then use the Import and Export Wizard again so you can import all the recovered items into your newly created .pst file.
3. Repair your Outlook program
If you’re having trouble using the Inbox Repair tool, you can try repairing your Outlook program as a whole. The steps involved in this might differ depending on what version of Outlook or Microsoft Office you’re using.
For Windows 10:
1. Right-click the Start button (lower-left corner) and select Apps and Features on the pop-up menu.
2. Select Outlook and select Modify.
3. Depending on your Office installation type (Click-to-run or MSI-based), you'll see the following options to proceed with the repair. Follow the steps for your installation type.
- Click-to-runsome text
- In the window How would you like to repair your Office Programs, select Online Repair > Repair to make sure everything gets fixed. (The faster Quick Repair option is also available, but it only detects and then replaces corrupted files.)
- MSI-basedsome text
- In Change your installation, select Repair and then click Continue.
4. Follow the instructions on the screen to complete the repair.
For Windows 11:
- Right-click the Start button (lower-left corner) and select Installed apps on the pop-up menu.
- Select Outlook, click the ellipses, and select Modify.
- Continue with the steps above for Windows 10.
Repair your .pst file quickly with our proven tool
Dealing with corrupt files is always scary, especially because of the potential for data loss. If you’ve tried Outlook’s recovery tool with no luck, it might be time to consider something more powerful.
When you use Secure Data’s repair software, you can rest assured that you’re using a safe, proven tool to repair your Outlook mailbox. Once downloaded, our software helps you quickly locate missing, deleted, or corrupted files, then transfer your recovered data to another device with having to navigate complex file menus or exposing your data to third-party access.
Try a free demo of our software before you buy it to make sure it meets your needs. It supports Outlook 2010, 2007, 2003, XP, 2000, 98 and 97.


