
If you use one of the most popular email managers, Microsoft Outlook, you may experience this error message: “Sending reported error (0x8004010F): Outlook data file cannot be accessed.” This error comes up when Outlook can’t open or read the data file that stores your email messages and other information.
More often than not, it’s caused by either a corrupted Outlook profile or a change in the data file’s location. And though an error message might look worrying, you may be able to fix the problem.
Try a free demo of our Outlook Express File Repair to recover your data or run through our troubleshooting guide to understand several ways to fix Outlook error 0x8004010f.
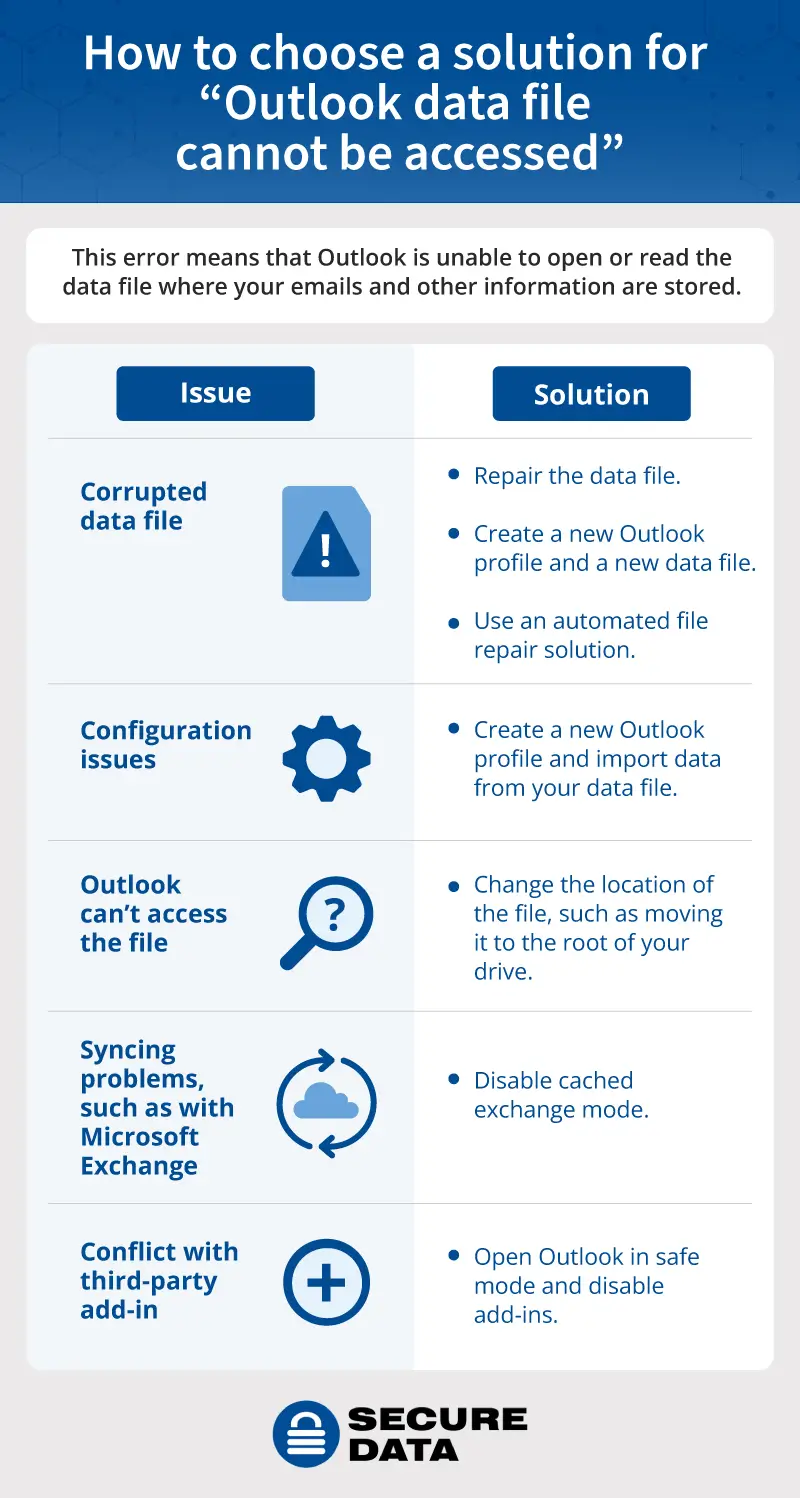
What causes “Outlook data file cannot be accessed”?
MS Outlook stores all the information related to your email account both online and in a local file on your computer. That way, you can access previously downloaded or synchronized messages, as well as calendar information, contacts, and tasks even when you’re offline.
How your data is synched also depends on the type of account you have. POP accounts store information directly on your computer in Outlook .pst files. On the other hand, accounts through Office 365, Exchange Server, Outlook.com, and IMAP store information offline in Outlook data files (.ost files).
If you’re seeing error 0x8004010F or the message “Outlook data file cannot be accessed,” that means Outlook can’t open the .pst or .ost file.
Some common causes include:
- A corrupted Outlook data file: Data file corruption or damage prevents Outlook from accessing the file.
- Software conflicts: Programs like third-party add-ins and antivirus software can interfere with how Outlook uses data files.
- Profile configuration: Incorrect settings or syncing problems with your Outlook profile can cause this error, like if a shared mailbox is configured in a way that isn’t compatible with offline sync.
- File location: If your data file is moved and the settings don’t reflect the correct location, Outlook won’t be able to access it.
How to fix “Outlook data file cannot be accessed”
Before you do anything else, see if you can fix errors by closing and restarting Outlook. If it doesn’t, continue with these steps.
1. Check your connectivity and settings
Before you change any settings or troubleshoot further, use these steps to check your connectivity and settings, and try restarting Outlook and your computer.
- Double-check your connectivity: Make sure you’re connected to the internet and that the connection is working.
- Check your firewall: Make sure your firewall settings are allowing Outlook to access the internet.
2. Locate and try to repair the data file
You can try to repair Outlook data files to fix the error. This is a good solution if you think your data file might be corrupted.
First, locate the data file for your email account:
- Launch Outlook.
- Click on the "File" tab in the top left corner.
- Find "Account Settings" and click it to reveal a drop-down menu.
- Select "Account Settings" from this list.
- Click on the "Data Files" tab. You’ll see a list of all the data files associated with your Outlook account. You should see a checkmark next to the default data file, which should be labeled as "Outlook Data File" or "Personal Folders File.”
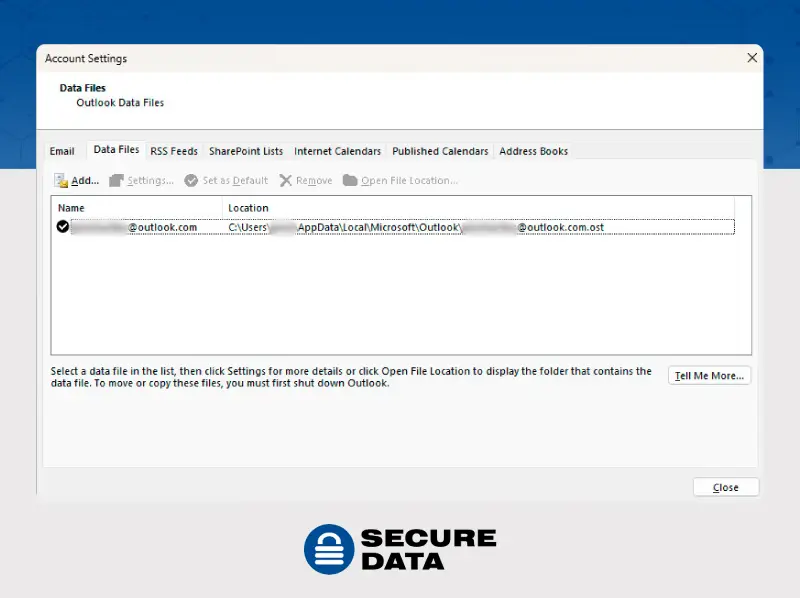
- You can also click "Open File Location" to open the folder where the data file is stored on your computer.
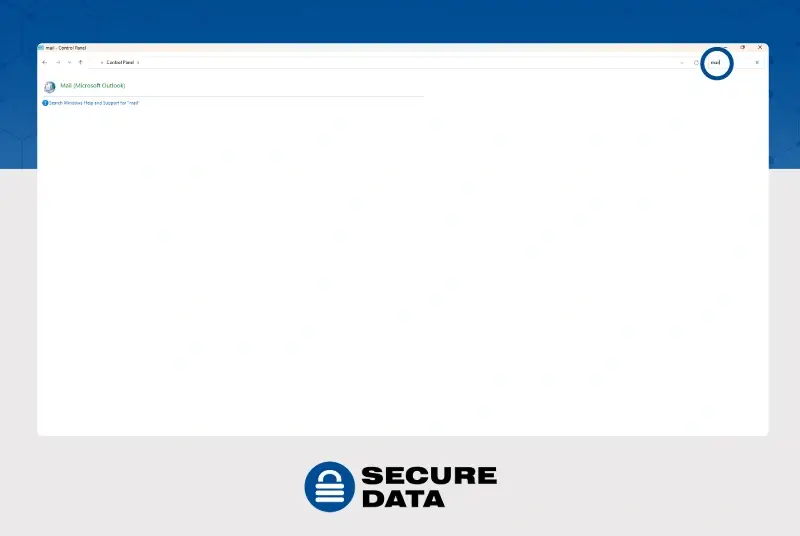
If you’re unable to access the file this way in your version of Outlook, try doing it through the Control Panel:
- Click the Windows icon (Start menu) and go to “Control Panel.”
- Search for “Mail” and click “Mail (Microsoft Outlook).”
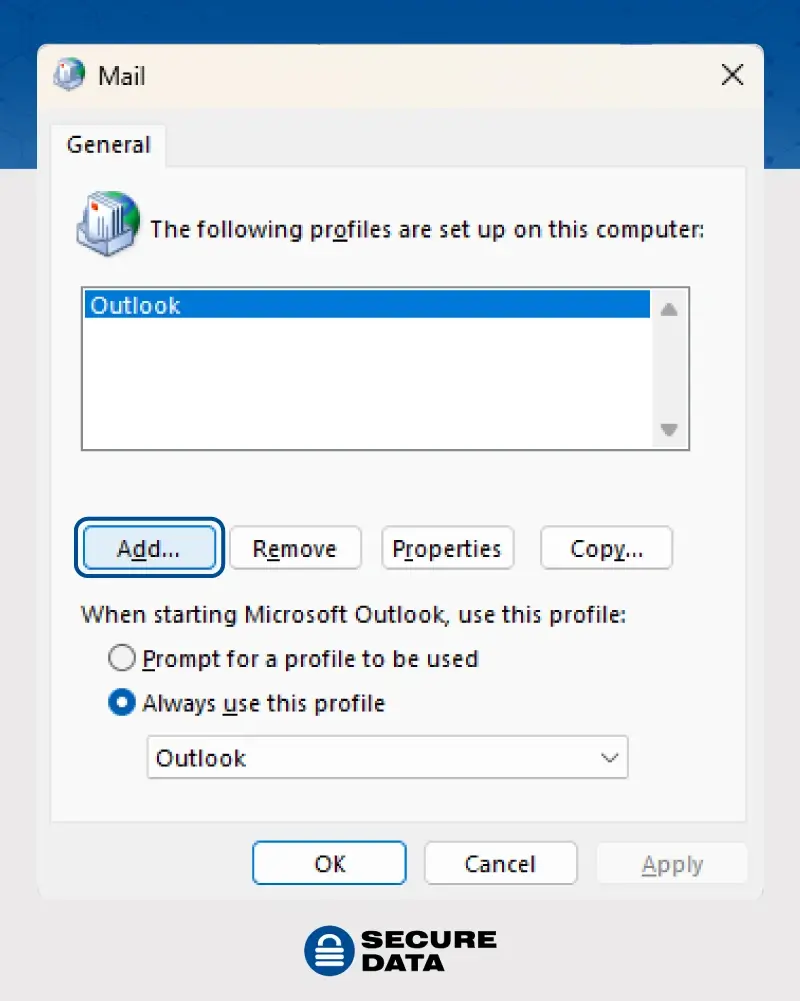
- In the “Mail Setup - Outlook” dialog box, select “Show Profiles.”
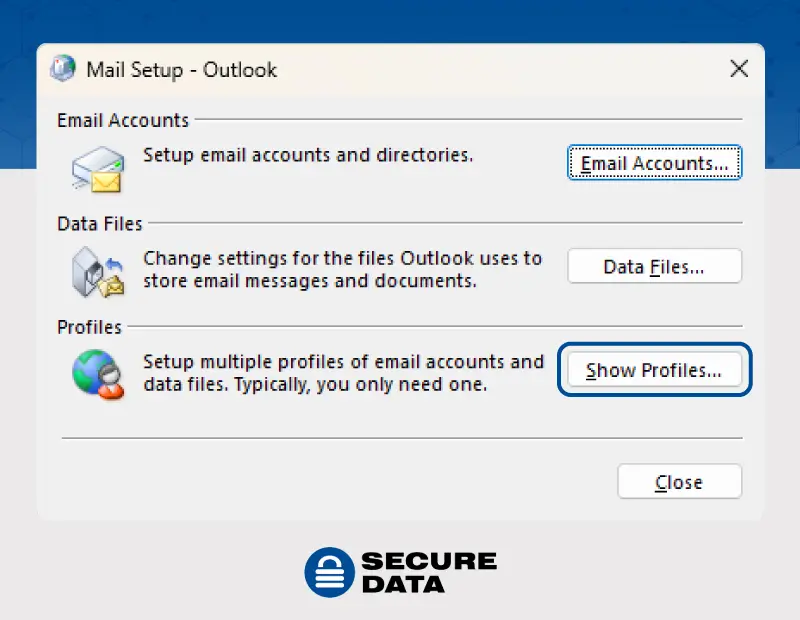
- Select your current Outlook profile and then select “Properties.”
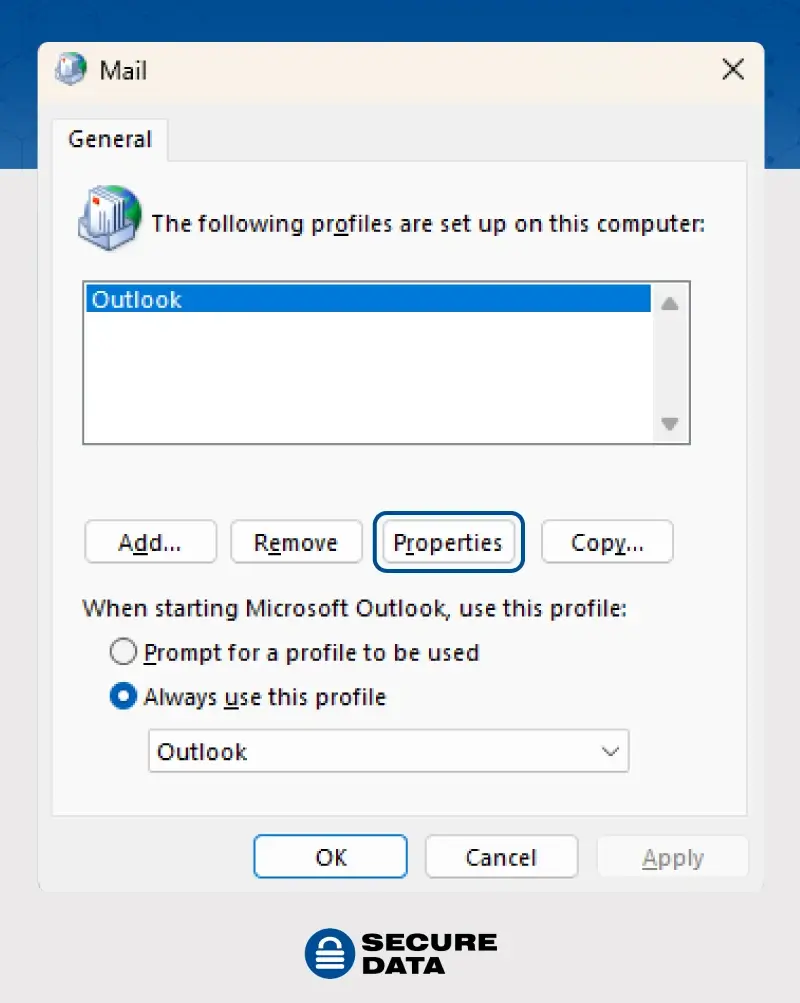
- In the “Mail Setup - Outlook” dialog box, select Data Files.
- Select the Data Files tab to view all of the data files. The default data file will be marked with a checkmark.
Once you’ve found the location of your Outlook data file, use the Inbox Repair tool (SCANPST.EXE) to diagnose and repair errors. Follow these steps:
- Exit Outlook and browse to one of the following file locations — use these locations based on the Outlook version you have:
- Outlook 2019: C:\Program Files (x86)\Microsoft Office\root\Office16
- Outlook 2016: C:\Program Files (x86)\Microsoft Office\root\Office16
- Outlook 2013: C:\Program Files (x86)\Microsoft Office\Office15
- Outlook 2010: C:\Program Files (x86)\Microsoft Office\Office14
- Outlook 2007: C:\Program Files (x86)\Microsoft Office\Office12
If you’re running the 64-bit operating system and not 32-bit, you’ll see “Program Files,” not “Program Files (x86).” If you’re unsure whether you have a 64- or 32-bit operating system, go to the Windows icon, select Settings, then click About. You can find the "System type" under "Device Specifications.”
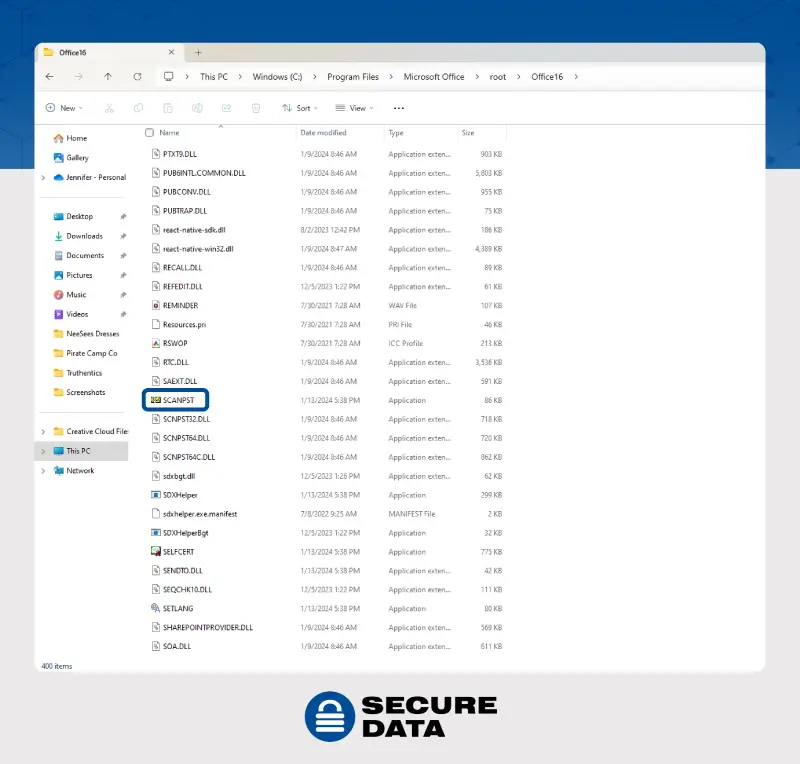
- Open SCANPST.EXE.
- Select “Browse” to select the Outlook Data File (.pst) you want to scan.
- Choose “Start” to begin the scan.
- Click “Repair” to fix any errors found in the scan.
- Start Outlook using the same profile associated with the data file that was repaired.
3. Create a new Outlook profile and import data from the existing file
If repairing the file doesn’t solve the issue, you can try creating a new Outlook profile and adding your existing file to it. This could help if you’re dealing with configuration issues but the file itself is okay.
Here are the steps to take:
- Click the Windows icon (Start menu) and go to “Control Panel.”
- Search for “Mail” and click “Mail (Microsoft Outlook).”
- In the “Mail Setup - Outlook” dialog box, select “Show Profiles.”
- Click “Add.”
- Enter a name for your new profile in the field and click “OK.”
- Select “Manual setup or additional server types” and click “Next.”
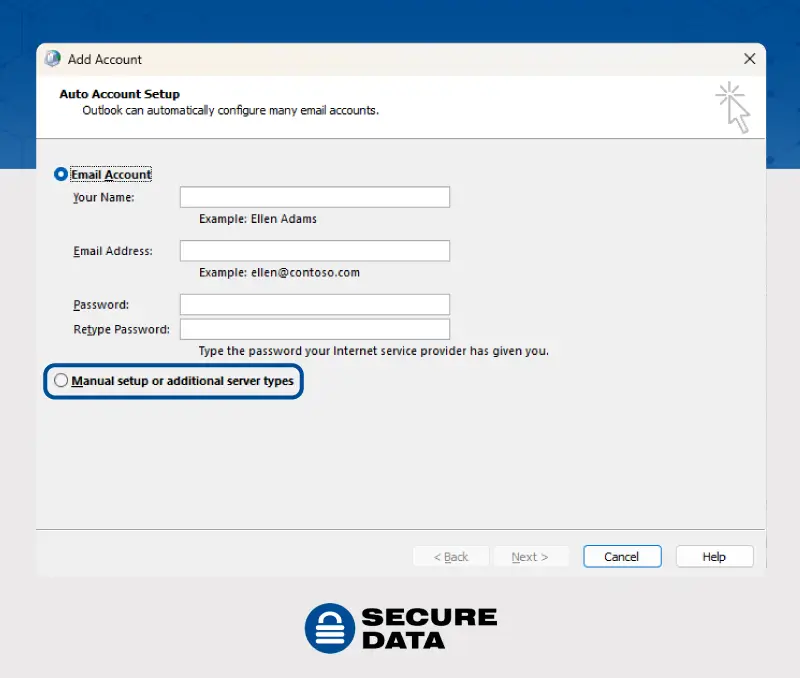
- If you have POP3 or IMAP details for your email account, select that option, and fill in your account information. Otherwise, choose the automatic setup.
- If you’re using Outlook 2010 or 2013, you’ll see a Choose Service dialog box. Select “Internet Email” and then type your details in the
“Internet Email Settings'' box.
- Under “Deliver new messages to” choose “existing Outlook data file” and select the file based on the file path you located in the previous step.
- Finish the setup wizard.
4. Create a new Outlook profile and a new data file
If your file is corrupted, you can use the auto account setup option to set your account up again from scratch, which creates a new data file. Here’s how to do it:
- Click the Windows icon (Start menu) and go to “Control Panel.”
- Search for “Mail” and click “Mail (Microsoft Outlook).”
- In the “Mail Setup - Outlook” dialog box, select “Show Profiles.”
- Click Add.
- Enter a name for your new profile in the field and click “OK.”
- Choose your email account, and enter your email address and password
- Once auto account setup is complete, you can delete the old profile if needed
- Before closing, go to the General tab of the Mail dialog box and select “Always use this profile.”
- If you have POP3 or IMAP details for your email account, select that option, and fill in your account information, and then under “Deliver new messages to,” choose “new Outlook data file.”
5. Change the location of the file
If you moved your data file or its location changed somehow, Outlook might not be able to find it.
This could happen if, for example, OneDrive backs up your Documents folder to the cloud and includes the Outlook Files folder where the file is located. During the syncing process, OneDrive locks the file, which prevents Outlook from accessing it, resulting in the “Outlook data file cannot be opened” error.
Here’s how to fix it:
- Move your .pst data file from OneDrive back to your computer, but don’t put it in the Documents folder. Put it in a different location, like, for example, the root of your drive.
- Open Outlook and point it to the .pst file at its new location. Do this by navigating to the Data Files tab in Account settings (shown in solution 2 above), and then clicking “Add” and selecting the new file.
- Close Outlook and go to the Control Panel. Access your Outlook email settings under User Accounts.
- Click "Change Folder" in the bottom left corner, and add a new folder. You could name it "test.”
- Open Outlook again and move any emails that you’re having trouble with to this test folder.
- Go back into the email settings and change the download email back to the inbox.
- If it’s working correctly, you can delete the test folder.
6. Disable cached exchange mode
Sometimes a syncing problem causes the error. For example, this could happen with Microsoft Exchange. You can fix it by disabling cached exchange mode.
Keep in mind that Outlook.com accounts default to cached exchange mode and can’t be changed, so if you’re using an Outlook.com account (as opposed to another email account accessed through Outlook), try our other solutions.
To disable cached exchange mode, follow these steps:
- In Outlook, click “File” then “Account Settings” then ”Account Settings” again from within that menu.
- Find your email account and select it.
- If the correct account is selected, click “Change.”
- Uncheck the box “Use Cached Exchange Mode . . .” which is found under “Offline Settings.”
- Exit from Outlook so you can restart the program.
7. Open Outlook in safe mode and disable add-ins
If you think a third-party add-in might be causing the error, try starting Outlook in Safe mode without any add-ins or extensions loaded to see if it works.
To do this:
- Right-click the Start button/Windows icon, and click “Run.”
- Type “Outlook.exe /safe” and click “OK.”
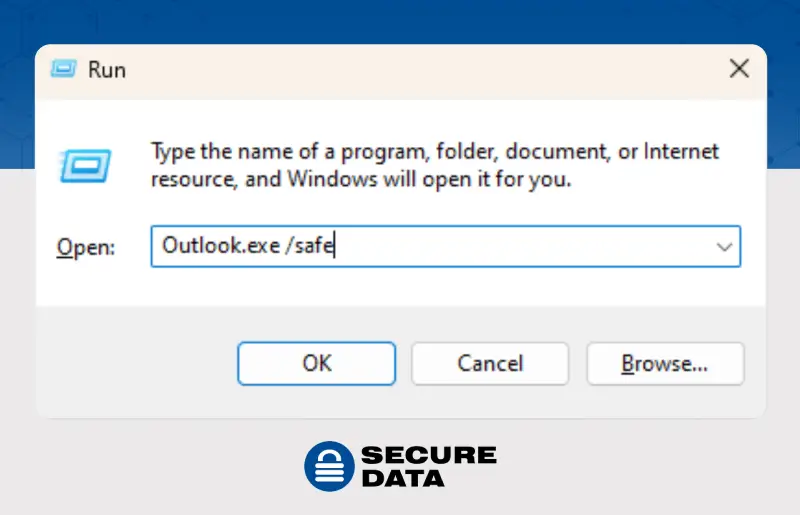
If this diagnostic step works and fixes the error, disabling your add-ins should help prevent it from happening again.
8. Use an automated file repair solution
Sometimes, data files get corrupted in a way that none of the methods above can help. This might happen due to a power failure or improper shutdown, hardware issues, or viruses and malware.
In situations like this, your best bet is usually a third-party file repair tool. Some benefits of this method include:
- Advanced repair capabilities and high success rates
- User-friendly interfaces
- Saving considerable time
- Direct customer support
- Preventing further errors or damage
For similar reasons, you might also consider taking your device to an expert for more help.
Recover your data today
It never feels great to run into an error message, especially if you’re in the middle of an important task. If you’re experiencing the “Outlook data file cannot be accessed” error and can’t find the fix, SecureData has you covered. Our Outlook Express file repair software is designed to help you repair your files and recover your data, so you don’t lose access to anything you need.


